Build A General Store


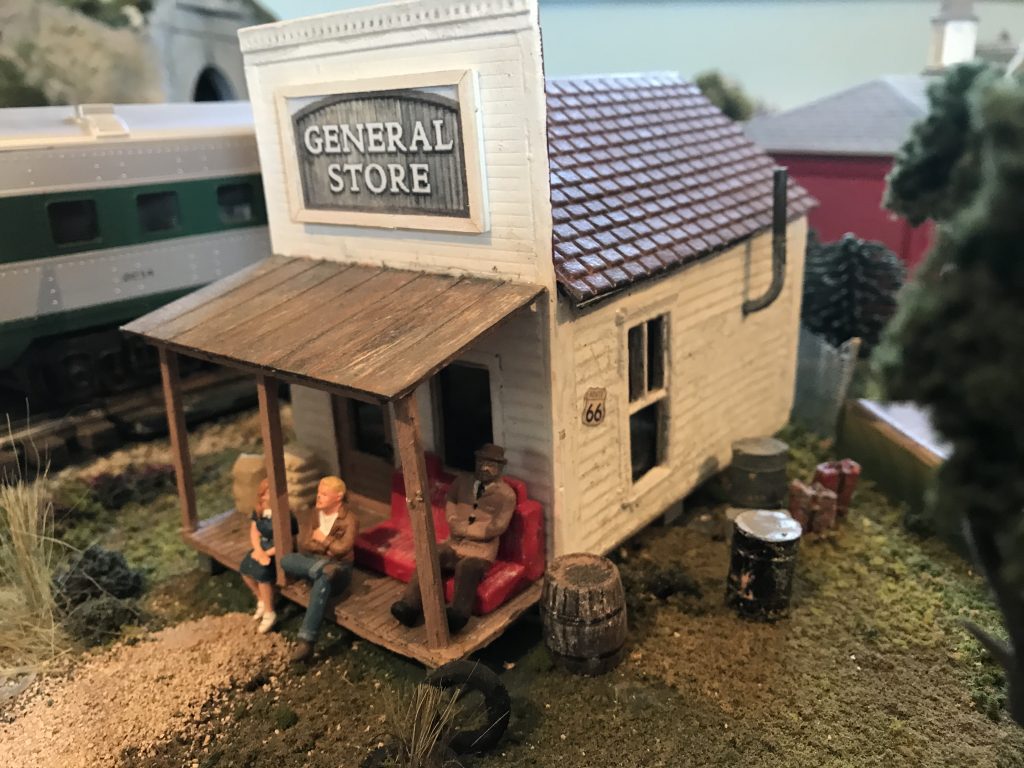
Every small community once had a General Merchandise Store. But the store doesn’t have to be big. This little store could also work as a small office: a land surveyor, a lawyer, a barber, a dentist, a post office. it’s adaptable to many uses, and the small size allows you to place it just about anywhere on you layout. Mine sits on the property just outside a curve bringing interest to what could be an easily overlooked corner of the layout.

Time and Difficulty

The goal is to build an versatile, small office that is suitable to fill any leftover space on your layout that needs attention. This project will take some moderate building skills and probably more than one day to finish.

What You’ll Need

  • Styrene sheet or foam core board
  • heavy card stock
  • optional: scraps of balsa or basswood for the pillars
  • clapboard texture sheet
  • metal roof or shingles textured sheet
  • carpenter glue
  • rubber cement
  • clear sheet acrylic or acetate
  • small craft or popsicle sticks
  • entry door
  • one small window
  • Optional: a second small window and or or door
  • Interior graphics and accessories

Cut Out the Floor, Walls and Roof

Cut a scale 12′ x 20′ floor out of heavy card stock and cut the walls and roof out of sheet styrene or foam core board. Cut the openings for doors and windows.

Construct a Base Frame

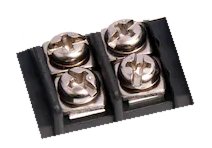
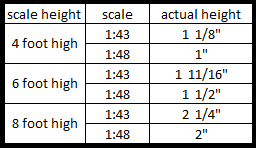
Build a wooden frame from the craft or popsicle sticks. The width of the sticks in unimportant, but the height should be between 1/8″ and 1/4″ (6 to12 scale inches). This will be the height of the sill plate and to me, less looks better.

<picture>

Glue the card stock flooring on to the base frame with a thin coat of carpenter glue. You want the flooring to be card stock so it doesn’t add much height. Glue any flooring graphic or material onto the card stock with rubber cement. Coat both the card stock flooring and the back of the flooring graphic or material with cement and let it dry. Once it’s dry, you can rub off any glue that got any where it shouldn’t be. Once both sides are dry, you get one shot at sticking them together, so be careful. The benefit of using rubber cement is that it will not curl paper products like white glue does.

Glue craft or popsicle sticks flush along the top edge of the side and back walls. This will give the roof support when it is added later. You may also want to glue a similar piece along one side wall of each wall to strengthen the corners, but that is up to you. Cover the exterior walls with clapboard material and the roof pieces with roofing material. Connect the two roof pieces at the top with a ‘paper hinge’ glued along the top edge of each of the roof pieces. The paper hinge will hold the roof pieces tightly together, but allow them to fit over the apex of the rear wall.
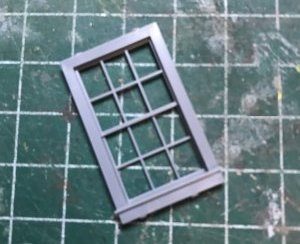
<picture>

Glue the door and window frames into the openings. Now is the time to paint your building. I recommend a white acrylic or white chalk paint works really well. NOTE: If you use chalk paint, NEVER wash your brushes out in the sink; chalk paint will clog the drain pipes. Glue any interior graphics you are using to the walls using rubber cement. Glue the clear plastic to the window frames using Testor’s Clear Cement and Window Maker. Testor’s clear will not craze the plastic and remains clear. Glue the four walls together and let them dry. Glue the roof on top, add external signage and you’re done!

divider

Dig it! A Swimming Pool


A swimming pool is certain to add interest to your layout

A swimming pool is not something you see on every layout. Lighted from below, it attracts your attention immediately, and it is so unique that I gave it a central location on my layout. The people you see in the water are 1:48 scale white metal figures by Arttista. The people standing around the pool are1:43 scale by Preiser. But you really don’t have to build a large community pool to use this technique. This method can be used for a backyard pool, a fountain or any small body of clean water.

Time and Difficulty

This swimming pool is easy to make, but will probably take a couple of days to construct.

What You’ll Need

  • foam core board
  • hot melt glue
  • a sheet of blue translucent acrylic, slightly textured
  • a small white LED or light bulb
  • heavy card stock
  • poolside figures
  • poolside graphics

Build a Box

For the pool structure, cut a rectangular pool deck to the dimensions of your overall pool area (pool opening and surrounding pavement) from foam core board., My deck is 6″ x 9″. Cut an opening in the pool deck the size of your pool. My pool is 4″ x 6″ (a scale 16′ x 24′). Cover the entire opening of the pool deck with the blue plastic sheet. Cut four pool walls, and construct an open box that will fit within the dimensions of the pool deck opening. In the center of the back wall, make a small hole for the bulb. Place the pool deck on the layout board and mark the dimensions. Cut a hole in your layout board slightly larger than your box dimensions and glue the box inside. Alternately, you can glue the box underneath your pool deck and fit it inside the hole., with accurate measuring and cutting, you can glue the foam core box flush inside the pool deck opening. Hot glue holds well and you only have to tack it; the foam core is not very heavy. You don’t have to worry about small gaps, you can cover the foam core deck with an optional heavy card stock “deck pavement”.

Pave the Pool Area

Cut heavy card stock to make the pavement around your pool. Cut an inner opening the size of your pool. I would make a the outer dimension a minimum of four feet (one inch scale) for a home walkway or up to six feet (3/4″ scale) for a commercial/public pool. Twelve feet (3″ scale) makes a good-sized area for sunning. For finishing details, you can add figures, a cooler, beach towel graphics, a fence, and wooden decking. Then pour yourself a Piña Colada and enjoy your new pool.

divider

A Weedy Track Siding


Spur sidings are rarely used or maintained to the degree that main trackage and passage sidings are maintained. Spur sidings might be privately owned and not served by the railway’s maintenance-of-way equipment. It’s not uncommon for a spur siding to have weeds growing within the ballast

Time and Difficulty

This is a simple project that can be done in just a short time, but really adds detail to your layout. It is a very easy way to improve the realism and short siding can be completed in less than an hour.

What You’ll Need

  • tacky glue
  • white or carpenter’s glue.
  • scissors
  • commercial grass Fiber or a wide natural fiber paint brush
  • small chunks of ground foam in grass color
  • finely ground foam in assorted grass colors

This is my own technique. There may be other techniques that are just as good or even better, but this will get you started. First, squirt a glob of tacky glue about half the diameter of a dime, wherever you want the grass to grow the tallest. That is typically next to the cross ties, rails, bridge abutments, tunnel buttresses, discarded lumber, ledge rocks, coal heaps, equipment boxes, fence posts, etc.; places where mowers don’t reach and people and animals don’t tread. Pinch the long grass fibers or paint brush bristles between your finger and thumb, and cut to about one inch length. Without letting go, work one end of the fibers down into the glue with a tight, circular motion making sure the outside edges are covered. Hold it until the fibers will stand up on their own. Repeat until you are satisfied with the coverage and density of the tall grass.

A rarely used track siding covered by weeds

Continue by gluing small clumps of grass-colored foam between the ties, especially on the ends.

The weedy siding will have a more convincing appearance, especially if the weeds are growing around discarded equipment.

Easy Window Mullions


window

Window mullions are so small, you would think them difficult to model. But using a technique credited to Tim Fairweather and Mike Chandwell, they can be modeled quite easily. You can watch Chandwell’s YoutTube video here.

Time and Difficulty

The goal of this project is to simplify the modeling of tiny window mullions. This project can be completed in a few hours, depending how many windows you decide to make. It requires moderate cutting skill with a straight edge and razor or scalpel.

What You’ll Need

  • Inexpensive label sheets
  • computer with drawing program (optional)
  • a printer (optional)
  • Clear acetate plastic (can come from a blister pack)
  • razor or scalpel
  • steel straight edge

Printing the Labels

Draw the windows full-scale with mullions about 3mm wide. Print the mullions in white or on a colored paper, and print the glass part in black or a contrasting color. Print them on full-size self-adhesive label paper. Inexpensive labels work better, premium labels tend to adhere too well.

Cut out one or two widows at a time from the label paper and press them on the clear plastic. Use a straight edge to guide your cuts, Cut along the outsides of each mullion using a straight edge to guide your blade. Cut fully from side to side, and top to bottom. don’t worry about the intersection of mullions, just cut through as if the crossing mullion weren’t there. Cut lightly using a sharp blade. Try to cut completely through the label paper without cutting through the clear plastic.

The Magic

Once all the mullions are cut out, use the knife point to lift the corner of the dark boxes, leaving the mullions firmly attached to the plastic. Trim the plastic to the window size and finish with a frame.

Build An Electric Junction


electrical junction
An electrical junction lets you make tight connections

Without a doubt, most structures look much better with a lighted interior. Unless you use a battery, a lighted interior will require some kind of external wire connection to a source of power. You could connect your wires straight to the source, but what if you want to remove the building later to replace or repair it? It would be nice to have some kind of reusable connection between your structure and the power source. You could just leave your power wires dangling freely in the breeze, or put crimp connectors on them, but that’s not very tidy. Here is a clean, elegant and inexpensive solution to connect your hand-made structure to electrical power.

Time and Difficulty

The goal of this project is to make a simple and inexpensive yet durable power junction for connecting and disconnecting wire leads between lighted accessories and the power source. This project takes a few hours or less and requires minimum skill.

What You’ll Need

  • thick styrene strips about 3/4″ wide
  • drill and drill bit, same diameter as bolts
  • (2) small stainless steel bolts
  • (2) small stainless steel washers
  • (4) small stainless steel nuts
  • 18-gauge stranded hook-up wire
  • 2 crimp rings and crimper (optional)
  • wire strippers
  • cyanoacrylate glue (super glue)
  • soldering iron and solder

Construction

Cut the styrene into strips 1 ½” to 2″ long. Drill two holes centered vertically. Cut the hook-up wire into a manageable length do ONE of the following:

  • Option 1: Strip 1/4″ of insulation from the end of the wire. Feed the wire into the crimp ring and crimp it down. Repeat to make two.
  • Option 2: Strip 1″ of insulation from the end of the wire. Fashion the wire into a loop and solder it. Repeat to make two.
Exploded view

Install a washer on each bolt and push them through the holes in the styrene. Add a nut and tighten it down. Slip one crimp ring OR one wire loop over each bolt and add a second nut as shown in the diagram. (Note: You may want to add a lock-washer here) Glue the nuts in place with cyanoacrylate (Super Glue). When the glue dries, the nuts should hold fast, but the bolts should move freely inside the nuts. Loosen the bolts to allow for external wire connections and then tighten them back down. Do not over-tighten the bolts, or the nut will break free. Glue the junction assembly to the back of your project and connect the lead wires from the crimp ring or wire loop to the lights inside your project.

Don’t have the Time?

You think this is an awesome idea, but you don’t have the time or the desire to make your own? You can buy terminal strips from my favorite electrical parts store, All-Electronics.com. Strips come in different sizes, from one to 12 junctions per strip,

All Electronics
store logo
terminal strip
terminal strip

Modify a 1:43 Scale Work Truck


The toy company, ERTL, makes a highly detailed 1947 International truck cab in their Vintage Vehicles Series. The model features a die-cast metal frame and body, free-rolling plastic wheels with rubber tires, and clear plastic windshield and headlight lenses. It is quite easy to find one for sale and not terribly expensive. I have only seen it offered in bright glossy yellow with glossy brown fenders.

product image
1947 International K-12 Semi-Cab by ERTL

The ERTL truck is a very nice model and makes a great foundation for a work or farm truck on an O-scale layout. But fresh out-of-the-box, the truck is shiny glossy new, which is never the case with an actual work truck.

Time and Difficulty

The goal of the modification is to make the ERTL truck more realistic in appearance. Commercial vehicles usually see rough treatment during their service life. The modified truck will be no exception. Time and use have aged the paint, and the fenders are no longer the smooth sweeping curves that left the factory. It will be fitted with a custom-made stake bed to allow it to haul a work load. The bed project takes one afternoon and requires moderate skill. The body repaint takes two days and requires intermediate skills with a rotary tool .

What You’ll Need

  • An ERTL die cast 1947 International K-12 Semi-Cab
  • resin-castings (oil drums, gas cans)
  • wooden cubes, 1 inch square and smaller
  • 1/8″ – 1/16″ wood strips
  • carpenter’s glue
  • rotary tool with sanding, grinding and polishing bits
  • isopropyl alcohol
  • paper towels
  • Age-It wood stain or black ink wash
  • flat paints in various colors
  • paint brushes
  • masking tape

Modify the Truck Body

There are two steps to modifying the body: aging the body and repainting. The aging process entails adding signs of wear to the body. The evidence will be dents in the sheet metal, and maybe loss of a side mirror. It is entirely up to you and requires a little skill with a rotary grinder and a good eye.

Customized with a stake bed

You can’t just take a hammer to cast steel models and create dents. At best, the blows will do nothing, and at worst you will crack the casting. Dents have to actually be cut into the metal with a coarse grinding stone. With a grinding bit in your rotary tool, begin grinding each dent into the fender or sheet metal. You’ll have to remove quite a bit of material to make a realistic dent, but be careful not to grind all the way though the casting or your dent will become a hole.

This step may seem strange, but once you have given the dent the rough shape you want, switch to a polishing bit. Coat the bit with polishing paste and polish the dent down to a mirror-smooth surface. Clean with alcohol and a dry paper towel to remove the polishing paste and prepare for paint. Cover the windows, tires, wheels and headlight lenses with masking tape and paint the truck a light, flat color. Light colors look best because, just as in real life, dark colors tend to fade over time.

Build the Truck Bed

Because the Semi-Cab doesn’t come with a bed or trailer, you’ll need to build one from scratch. The bed boards should be be between 3″ and 12″ wide. The bed itself should be between 48 and 66 full scale inches wide. I don’t typically measure the bed width; I just make sure it completely covers the dual rear tires. Cut the bed boards to length and lay them out side-by-side. Use Carpenter’s glue to secure two or three more sticks perpendicular to the boards to hold them in place.

Use Tacky glue or cyano glue to fasten two thick wooden sticks to the metal truck frame. Paint or stain all the wood surfaces with flat paint, Age-It or an ink wash. You can glue resin castings, small wooden cubes, and thin jewelry chain onto the bed for additional interest.

Finishing Details

Once the truck body has been painted, remove the masks and prepare for final detailing. From the top down:

  • Paint the cab marker lights with flat silver (or leave the body color) and the lenses bright amber.
  • Consider removing a headlamp.
  • Paint unnaturally bright plated parts with gloss silver to tone them down.
  • Consider a rust-colored wash and other weathering techniques.
  • Add resin-cast or hand-made detail items.

The ERTL International semi-cab is a fine O scale truck model right out of the box, but with a bit of time and effort, the looks of the truck can be transformed into a realistic representation of a road-ravaged commercial workhorse.

Build a Barbed Wire Fence


barbed wire fence
A farm truck holds the supplies to repair a barbed wire fence

Barbed wire fences are typically used on farms and ranches to contain large animals on the property. Barbed wire fences typically have three or four runs of twisted metal wires with sharp barbs evenly spaced along the length of the wire. Steel fence posts are driven into the ground, and the barbed wire is stretched tightly between the posts, evenly spaced from top to bottom. Barbed wire fences are a little more difficult to model than chain link fence, and they take a little more work.

Time and Difficulty

The Goal is to provide an easy way make a reasonable representation of a three- or four-strand barbed wire fence in that can be accomplished in less than a day.

What You’ll Need

  • Square toothpicks
  • Red or green and white paint
  • Wire screen mesh materials
  • Tacky glue
  • grass-colored finely ground foam
  • Small drill bits (the same diameter as your toothpicks)
  • Diagonal cutters, a sharp knife, or a hobby saw

Measurement and Post Installation

The installation procedure follows real-world fence construction. First, you need to determine the number of p The installation procedure follows real-world fence construction. First, you need to determine the number of posts you will use. Measure the total distance you need your fence to cover. Measure each section of straight run from corner post to corner post separately. Divide the total distance by your intended separation of you fence posts (I recommend 2, 2.5 or 3 inches). Round up to the next whole number. For example: You want to build a fence run of fourteen inches with a post spacing of approximately three inches apart. To determine he number of posts, divide the 14” run by the 3” spacing to get 4.666. Round up to 5 posts. If you decide to space the posts closer to two inches apart, you will need a total of eight posts (14” divided by 2” equals 7, rounded up to 8). Equally space the posts by dividing the run distance by the number of posts, (for this example, 14″ divided by 5 posts equals 2.8″ or approximately 2 3/4″ spacing) Mark the corners and place a mark every 2 3/4″ to show where each post will go. Adjust if necessary to make each section the same length.

For barbed wire fence posts, you will need square toothpicks instead of round. Paint them either glossy green or red. The top 1/8″ of each fence post is painted white if you want to simulate the reflective coating on the top of some manufactured posts. Drill holes and set the toothpicks with a drop of Tacky Glue. Doo not wipe away any excess glue, but embed a bit of grass-colored finely ground foam in the glue for a more natural look.

Stretch the Fence

You can use either single strands of wires unraveled from screen mesh material, or a small-gauge non-insulated wire. I like to use wire pulled from screen mesh instead of regular straight wire because it has a kinkiness that simulates the stranding of real barbed wire. If you use the wire mesh, unravel an edge of the screen producing three or four long strands of wire.

Put a drop of tacky glue near the bottom of the end post, and wrap the wire around twice, twisting the loose end around itself to secure it. Then run the wire from post to post giving each post a double wrap of wire and a dot of glue. Secure the wire to the final post just like the first post. Repeat each run a little higher on the post for three- or four-line fencing.

Variations:

Instead of steel, use wood posts. Before steel posts, farmers used hardwoods like locust or oak to build line fences. You can build your fence with wooden posts. The tree posts were typically 6″ to 8″ in diameter. You can also use trees in your line fence. It was not uncommon for fences to be strung from tree to tree since old property lines were described as “from this tree to that tree,” and especially for a tree to be used as a corner since it would hold up better than a post. Sometimes a metal post will be used to replace a broken or rotted wooden post in a line fence, so you can mix woods and steel posts randomly in a fence line. Finally, it is really hard to keep a fence line clean. Glue plenty of weeds along the bottom of the fence and fence posts.

Build a Split-Rail Fence


split rail fence
The split rail is one of the oldest and simplest of fences

Split-rail fencing is one of the oldest and simplest fences to build. It was very prevalent in the 1800’s along farmlands to keep animals contained. Years later, the rustic beauty was used for home landscaping. Today, you kind find split-rail fencing in parks, campgrounds and historic sites.

The rails of the fence were split from the trunk of a tree and cut to length, usually 8 feet. The split rails were laid on top of each other at a little more than a 90 degree angle. The rails alternated back and forth for stability and no posts were required. Because the bottom rails lay directly on the ground, no holes had to be dug, The fence was quick to put up, especially in rocky terrain where digging post holes was out of the question. however this also meant the fences did not usually last long.

Time and Difficulty

The goal of this project is to build a simple historic and decorative fence. The project is super easy and takes less than a day.

What You’ll Need

  • long fireplace matches or similar sized wood
  • hobby saw or knife
  • aging wash (see instructions)
  • tacky glue

Building the Fence

To build split rail fences in O scale, long fireplace matches are the way to go. Simply cut the heads off and cut them into scale six-foot or eight-foot pieces. The more imperfections the matchsticks have, the better the final product will look. You can leave them natural color for new fences. For older fences, scrape a serrated hobby saw along the face of the stick to texture the surface, then paint with a traditional grey ink wash, or with a weathering product I recommend: Age-It Easy liquid wash.

Grey Ink Wash

Make a grey ink wash by diluting india ink or black acrylic paint with water and a drop of dish washing detergent or isopropyl alcohol. Stain each stick individually before stacking and gluing. The weathering wash will not penetrate most glues.

Here is a good article by Harold Minkwitz on weathering wood on the Pacific Coast Air Line Model Railway.

Build It

Stack the sticks with between a forty-five and a ninety degree angle between rails, using a drop of tacky glue to secure them. For older fences, you may break a rail or two, have some rails fallen over, or even glue foliage climbing over the neglected rails.

So there you go, good friend. A super simple method for building historic fences on your layout.

Build a Chain Link Fence


Chain link fencing protects people, animals, and property

The chain link fence is one of the most common types of fence. It is used around commercial businesses as a barrier to protect property from vandalism and inventory from theft. It is used around schools and public buildings to limit people’s access and to keep children safely away from traffic, water, or electrical dangers. It is used around homes to keep pets from running away or biting the neighbors. I’m sure there is some place on your layout that could use some chain link fence.

Time and Difficulty

Chain link fences are made by stretching a woven wire material between aluminum posts. We will duplicate that in O-scale using screen wire mesh. This project is very simple, but may take a few days depending on how much fencing you want to install.

What You’ll Need

  • Round toothpicks
  • Silver paint
  • Wire screen mesh material
  • Tacky glue
  • grass-colored finely ground foam
  • Small drill bits (the same diameter as your toothpicks)
  • Diagonal cutters, a sharp knife, or a hobby saw

Chain link fencing is easy to make with screen wire and toothpicks. You’ll need round toothpicks to be the posts. Be sure to use wire screen mesh and not the fiberglass mesh; the fiberglass is flat, not woven, and it doesn’t give the right “look.” When I built the chain link fence in the picture above, I simply cut a long strip of mesh along the edge of the material. Perfectionists and those who model high rail will realize that the mesh pattern is off by 45 degrees. That’s okay for me. Admittedly, the mesh material looks more realistic if you cut it on the diagonal verses parallel with the pattern. There will be a lot of wasted material cutting on the diagonal, but if you want the appearance to be the most realistic, you should cut your screen material on the diagonal.

comparison of cutting the wire mesh parallel to the edge versus cutting it on the diagonal

Residential chain link mesh is four feet high. Commercial applications can be six foot or higher. For a standard four-foot high fence, cut a strip of screen material from 1″ inch to 1 1/8″ inch wide. (The reason for the range of values is to account for variations of what “O scale” is). The ranges I give allows for a variation in the scale between 1:43 and 1:48 ratios. For a six foot high fence, cut a strip of screen wire 1 ½ to 1 9/16 inches wide. For an eight foot high fence, cut a strip between 2 inches and 2 ¼ inch wide.

Cut your screen mesh material to the actual height.

Measurement and Installation

The installation procedure follows real-world fence construction. First, you need to determine the number of posts you will use. Measure the total distance you need your fence to cover. Measure each section of straight run from corner post to corner post separately. Divide the total distance by your intended separation of your fence posts (I recommend 2, 2.5 or 3 inches). Round up to the next whole number. For example: You want to build a fence that runs fourteen inches with a post spacing of approximately three inches apart. To determine he number of posts, divide the 14” run by the 3” spacing to get 4.666, then round up to 5 posts. If you decide to space the posts closer to two inches apart, you will need a total of eight posts (14” divided by 2” equals 7, rounded up to 8). Equally space the posts by dividing the run distance by the number of posts, (for this example, 14″ divided by 5 posts equals 2.8″ or approximately 2- 3/4″ spacing) Mark the corners and place a mark every 2-3/4″ to show where each post will go. Adjust if necessary to make each section the same length.

Select toothpicks that are round, not square. Do not cut them yet. Paint them silver. Using a drill bit slightly smaller than the diameter of the toothpick, drill holes where you marked for the posts. Glue the toothpicks in the holes with tacky glue. Instead of wiping away any excess glue around the base, embed a little grass-colored ground foam in the glue for a more natural look of weeds or grass growing up against the post.

When the glue has dried, stretch the screen material out and tie it to the top of each post by threading a short piece of wire through the material and twisting it around the toothpick like a bread-tie. Once tied to the post, put a drop of tacky glue to secure it. You may prefer to run a bead of tacky glue down the length of each post to secure the mesh to. Wire tie and glue the mesh at the bottom also. Proceed to tie the material to the top and bottom of each fence post using a dot of tacky glue to hold it securely. Cut off the excess post above the fence material with diagonal cutters, a sharp knife, or a hobby saw. Touch up the top of the posts with paint if needed.

There you have it. A quick way to make chain link fence for your model railroad.