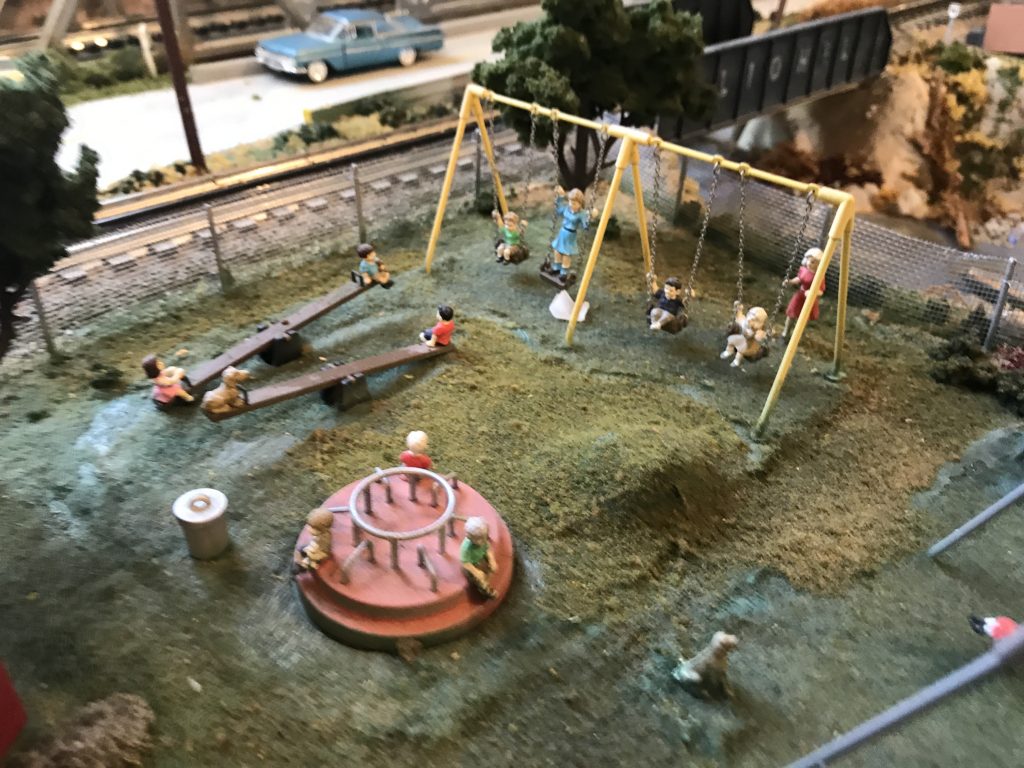
The chain link fence is one of the most common types of fence. It is used around commercial businesses as a barrier to protect property from vandalism and inventory from theft. It is used around schools and public buildings to limit people’s access and to keep children safely away from traffic, water, or electrical dangers. It is used around homes to keep pets from running away or biting the neighbors. I’m sure there is some place on your layout that could use some chain link fence.
Time and Difficulty
Chain link fences are made by stretching a woven wire material between aluminum posts. We will duplicate that in O-scale using screen wire mesh. This project is very simple, but may take a few days depending on how much fencing you want to install.
What You’ll Need
- Round toothpicks
- Silver paint
- Wire screen mesh material
- Tacky glue
- grass-colored finely ground foam
- Small drill bits (the same diameter as your toothpicks)
- Diagonal cutters, a sharp knife, or a hobby saw
Chain link fencing is easy to make with screen wire and toothpicks. You’ll need round toothpicks to be the posts. Be sure to use wire screen mesh and not the fiberglass mesh; the fiberglass is flat, not woven, and it doesn’t give the right “look.” When I built the chain link fence in the picture above, I simply cut a long strip of mesh along the edge of the material. Perfectionists and those who model high rail will realize that the mesh pattern is off by 45 degrees. That’s okay for me. Admittedly, the mesh material looks more realistic if you cut it on the diagonal verses parallel with the pattern. There will be a lot of wasted material cutting on the diagonal, but if you want the appearance to be the most realistic, you should cut your screen material on the diagonal.

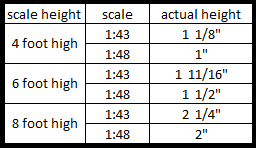
Residential chain link mesh is four feet high. Commercial applications can be six foot or higher. For a standard four-foot high fence, cut a strip of screen material from 1″ inch to 1 1/8″ inch wide. (The reason for the range of values is to account for variations of what “O scale” is). The ranges I give allows for a variation in the scale between 1:43 and 1:48 ratios. For a six foot high fence, cut a strip of screen wire 1 ½ to 1 9/16 inches wide. For an eight foot high fence, cut a strip between 2 inches and 2 ¼ inch wide.
Measurement and Installation
The installation procedure follows real-world fence construction. First, you need to determine the number of posts you will use. Measure the total distance you need your fence to cover. Measure each section of straight run from corner post to corner post separately. Divide the total distance by your intended separation of your fence posts (I recommend 2, 2.5 or 3 inches). Round up to the next whole number. For example: You want to build a fence that runs fourteen inches with a post spacing of approximately three inches apart. To determine he number of posts, divide the 14” run by the 3” spacing to get 4.666, then round up to 5 posts. If you decide to space the posts closer to two inches apart, you will need a total of eight posts (14” divided by 2” equals 7, rounded up to 8). Equally space the posts by dividing the run distance by the number of posts, (for this example, 14″ divided by 5 posts equals 2.8″ or approximately 2- 3/4″ spacing) Mark the corners and place a mark every 2-3/4″ to show where each post will go. Adjust if necessary to make each section the same length.
Select toothpicks that are round, not square. Do not cut them yet. Paint them silver. Using a drill bit slightly smaller than the diameter of the toothpick, drill holes where you marked for the posts. Glue the toothpicks in the holes with tacky glue. Instead of wiping away any excess glue around the base, embed a little grass-colored ground foam in the glue for a more natural look of weeds or grass growing up against the post.
When the glue has dried, stretch the screen material out and tie it to the top of each post by threading a short piece of wire through the material and twisting it around the toothpick like a bread-tie. Once tied to the post, put a drop of tacky glue to secure it. You may prefer to run a bead of tacky glue down the length of each post to secure the mesh to. Wire tie and glue the mesh at the bottom also. Proceed to tie the material to the top and bottom of each fence post using a dot of tacky glue to hold it securely. Cut off the excess post above the fence material with diagonal cutters, a sharp knife, or a hobby saw. Touch up the top of the posts with paint if needed.
There you have it. A quick way to make chain link fence for your model railroad.