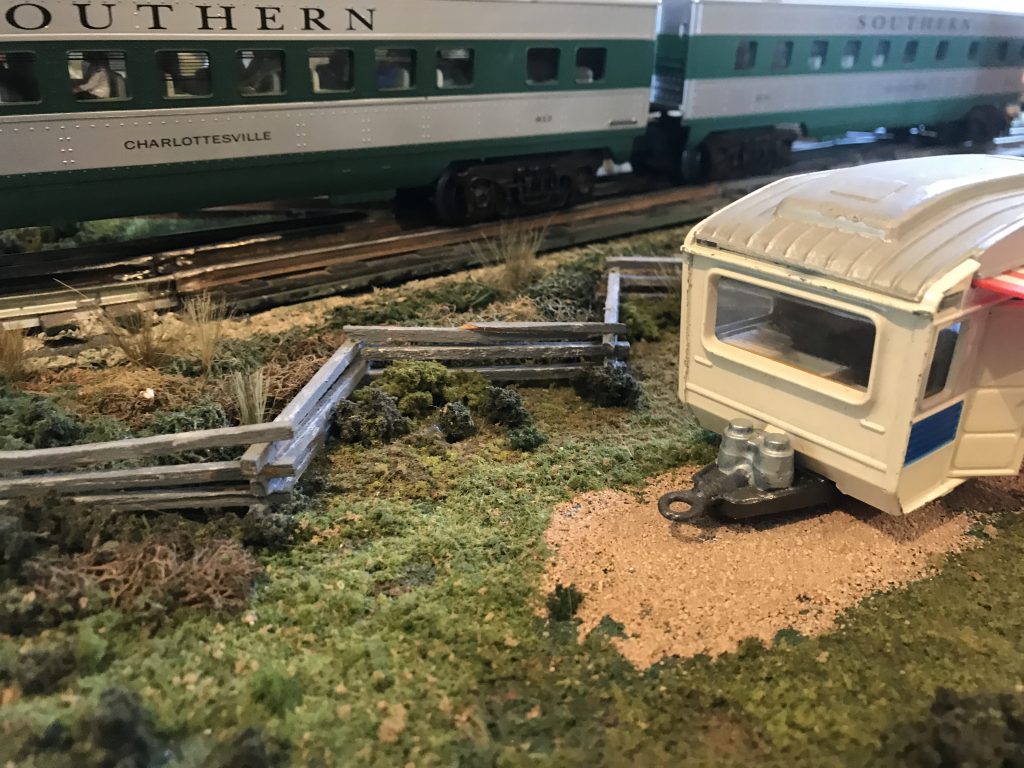
Barbed wire fences are typically used on farms and ranches to contain large animals on the property. Barbed wire fences typically have three or four runs of twisted metal wires with sharp barbs evenly spaced along the length of the wire. Steel fence posts are driven into the ground, and the barbed wire is stretched tightly between the posts, evenly spaced from top to bottom. Barbed wire fences are a little more difficult to model than chain link fence, and they take a little more work.
Time and Difficulty
The Goal is to provide an easy way make a reasonable representation of a three- or four-strand barbed wire fence in that can be accomplished in less than a day.
What You’ll Need
- Square toothpicks
- Red or green and white paint
- Wire screen mesh materials
- Tacky glue
- grass-colored finely ground foam
- Small drill bits (the same diameter as your toothpicks)
- Diagonal cutters, a sharp knife, or a hobby saw
Measurement and Post Installation
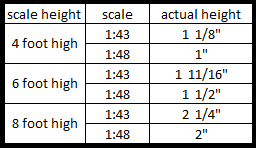
The installation procedure follows real-world fence construction. First, you need to determine the number of p The installation procedure follows real-world fence construction. First, you need to determine the number of posts you will use. Measure the total distance you need your fence to cover. Measure each section of straight run from corner post to corner post separately. Divide the total distance by your intended separation of you fence posts (I recommend 2, 2.5 or 3 inches). Round up to the next whole number. For example: You want to build a fence run of fourteen inches with a post spacing of approximately three inches apart. To determine he number of posts, divide the 14” run by the 3” spacing to get 4.666. Round up to 5 posts. If you decide to space the posts closer to two inches apart, you will need a total of eight posts (14” divided by 2” equals 7, rounded up to 8). Equally space the posts by dividing the run distance by the number of posts, (for this example, 14″ divided by 5 posts equals 2.8″ or approximately 2 3/4″ spacing) Mark the corners and place a mark every 2 3/4″ to show where each post will go. Adjust if necessary to make each section the same length.
For barbed wire fence posts, you will need square toothpicks instead of round. Paint them either glossy green or red. The top 1/8″ of each fence post is painted white if you want to simulate the reflective coating on the top of some manufactured posts. Drill holes and set the toothpicks with a drop of Tacky Glue. Doo not wipe away any excess glue, but embed a bit of grass-colored finely ground foam in the glue for a more natural look.
Stretch the Fence
You can use either single strands of wires unraveled from screen mesh material, or a small-gauge non-insulated wire. I like to use wire pulled from screen mesh instead of regular straight wire because it has a kinkiness that simulates the stranding of real barbed wire. If you use the wire mesh, unravel an edge of the screen producing three or four long strands of wire.
Put a drop of tacky glue near the bottom of the end post, and wrap the wire around twice, twisting the loose end around itself to secure it. Then run the wire from post to post giving each post a double wrap of wire and a dot of glue. Secure the wire to the final post just like the first post. Repeat each run a little higher on the post for three- or four-line fencing.
Variations:
Instead of steel, use wood posts. Before steel posts, farmers used hardwoods like locust or oak to build line fences. You can build your fence with wooden posts. The tree posts were typically 6″ to 8″ in diameter. You can also use trees in your line fence. It was not uncommon for fences to be strung from tree to tree since old property lines were described as “from this tree to that tree,” and especially for a tree to be used as a corner since it would hold up better than a post. Sometimes a metal post will be used to replace a broken or rotted wooden post in a line fence, so you can mix woods and steel posts randomly in a fence line. Finally, it is really hard to keep a fence line clean. Glue plenty of weeds along the bottom of the fence and fence posts.