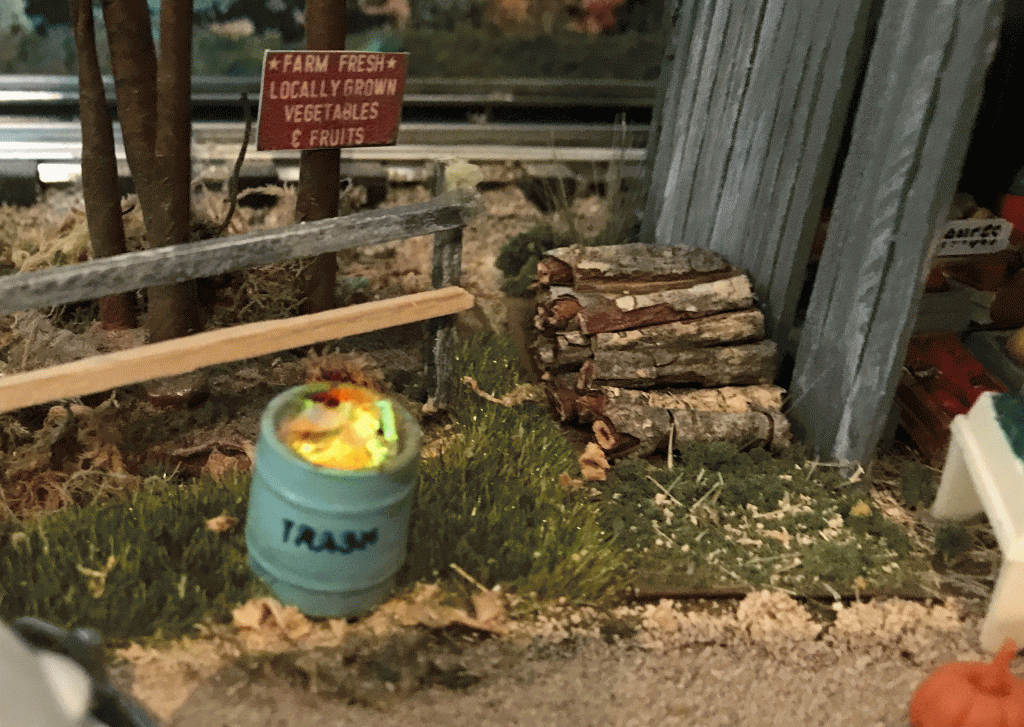
A stack of fire wood is a simple detail that can be repeated in numerous places on you layout, and yet they will never be out of place, and it will never seem like there are too many. A stack of fire wood works nicely beside any residence, a campground, or an outdoor business, like a produce stand or flea market,
Time and Difficulty
A super-simple project that can be completed in a few minutes.
Select Hardwoods
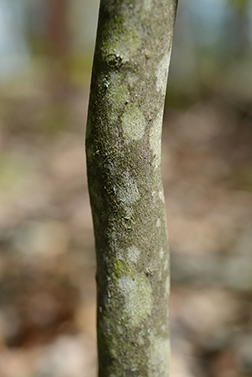
The best looking fire wood is made of real wood. There are two criteria I look for a natural wood twig to use for firewood. First, a tight grain and second, an outer layer that looks like tree bark. A tight grain is necessary so the the cut wood retains its solid, wood-like appearance. Some twig varieties will fray or split on the ends giving an unacceptable appearance. The second quality is a nice outer bark. Not only should the outer layer look like actual tree bark, but it should not fall off when it dries.
I have found three plants varieties that produce tight-grained non-fibrous twigs with an outer layer that resembles tree bark. The three varieties I recommend are:
Maple
Dogwood
Azalea
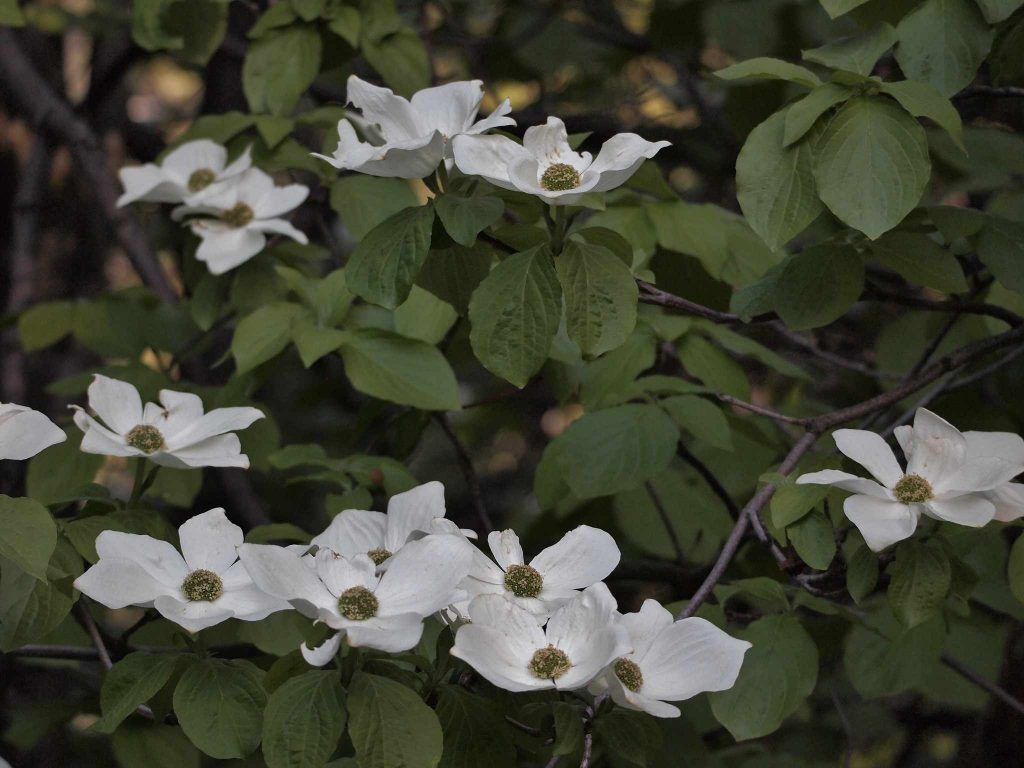
The twigs of the Azalea and the Dogwood (right) have an amazing looking bark that looks very natural and to scale.
The Dogwood tree produces twigs that can be split open to look exactly like split logs.
Once you’ve selected the wood, use a jig to cut it to length. Wider pieces can be split, just like real wood. Use carpenter’s glue to stack and secure your woodpile.
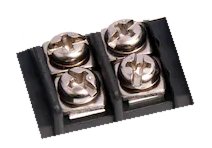
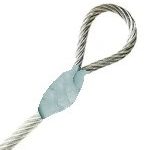
An electrical junction lets you make tight connections
Without a doubt, most structures look much better with a lighted interior. Unless you use a battery, a lighted interior will require some kind of external wire connection to a source of power. You could connect your wires straight to the source, but what if you want to remove the building later to replace or repair it? It would be nice to have some kind of reusable connection between your structure and the power source. You could just leave your power wires dangling freely in the breeze, or put crimp connectors on them, but that’s not very tidy. Here is a clean, elegant and inexpensive solution to connect your hand-made structure to electrical power.
Time and Difficulty
The goal of this project is to make a simple and inexpensive yet durable power junction for connecting and disconnecting wire leads between lighted accessories and the power source. This project takes a few hours or less and requires minimum skill.
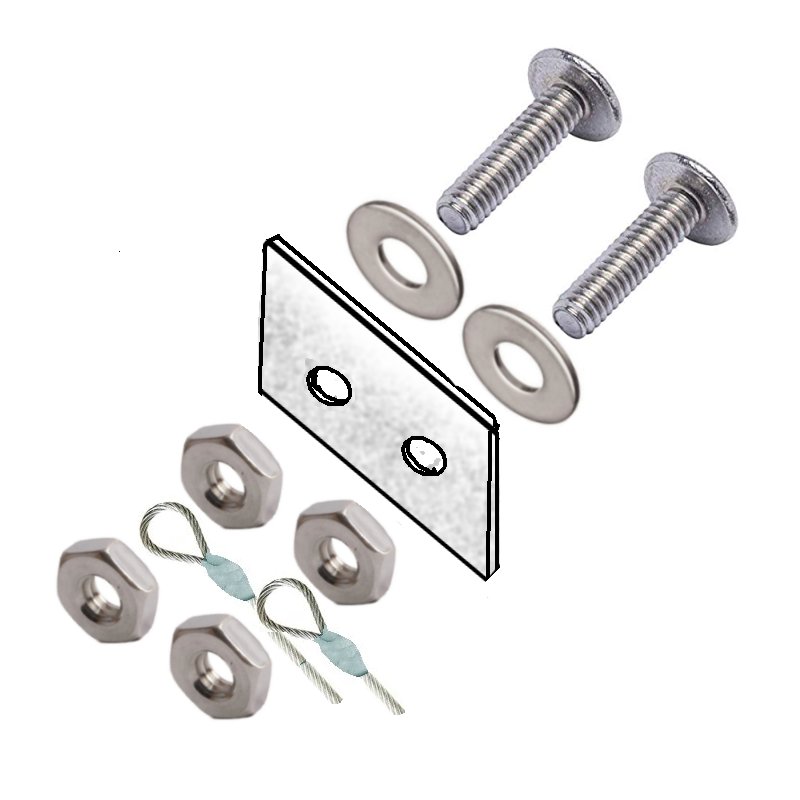
What You’ll Need
thick styrene strips about 3/4″ wide
drill and drill bit, same diameter as bolts
(2) small stainless steel bolts
(2) small stainless steel washers
(4) small stainless steel nuts
18-gauge stranded hook-up wire
2 crimp rings and crimper (optional)
wire strippers
cyanoacrylate glue (super glue)
soldering iron and solder
Construction
Cut the styrene into strips 1 ½” to 2″ long. Drill two holes centered vertically. Cut the hook-up wire into a manageable length do ONE of the following:
Option 1: Strip 1/4″ of insulation from the end of the wire. Feed the wire into the crimp ring and crimp it down. Repeat to make two.
Option 2: Strip 1″ of insulation from the end of the wire. Fashion the wire into a loop and solder it. Repeat to make two.
Exploded view
Install a washer on each bolt and push them through the holes in the styrene. Add a nut and tighten it down. Slip one crimp ring OR one wire loop over each bolt and add a second nut as shown in the diagram. (Note: You may want to add a lock-washer here) Glue the nuts in place with cyanoacrylate (Super Glue). When the glue dries, the nuts should hold fast, but the bolts should move freely inside the nuts. Loosen the bolts to allow for external wire connections and then tighten them back down. Do not over-tighten the bolts, or the nut will break free. Glue the junction assembly to the back of your project and connect the lead wires from the crimp ring or wire loop to the lights inside your project.
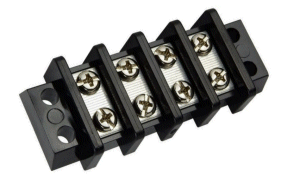
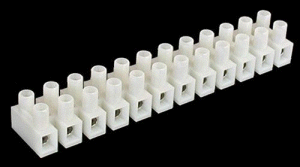
Don’t have the Time?
You think this is an awesome idea, but you don’t have the time or the desire to make your own? You can buy terminal strips from my favorite electrical parts store, All-Electronics.com. Strips come in different sizes, from one to 12 junctions per strip,
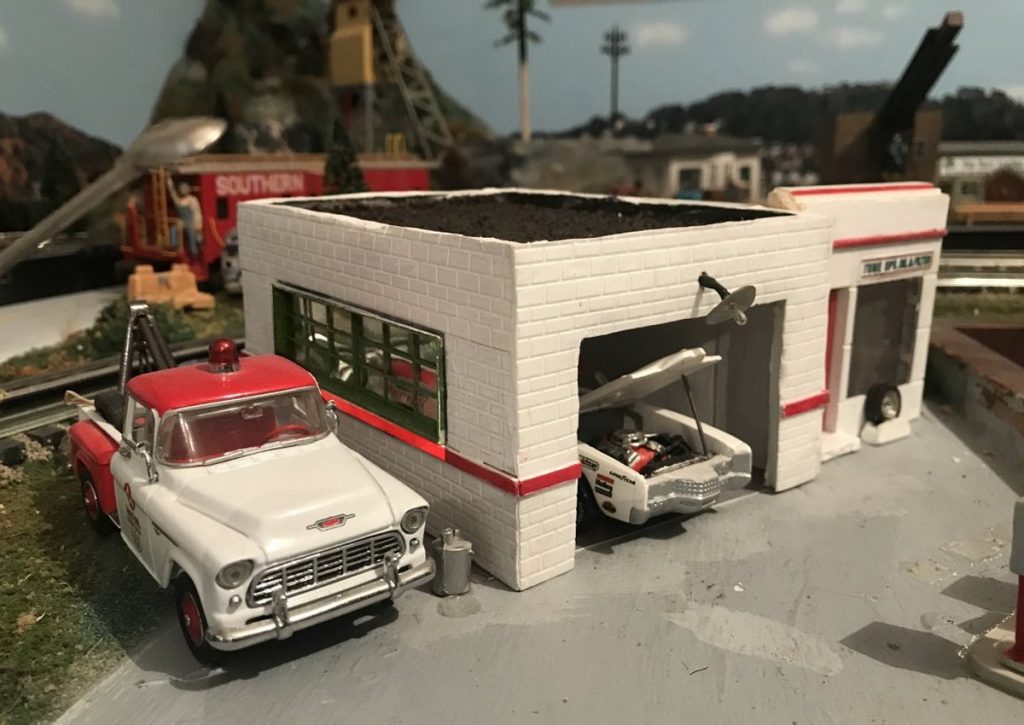
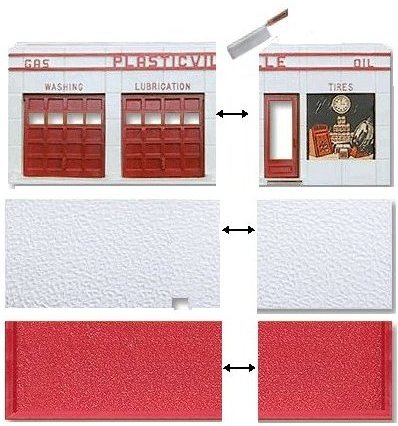
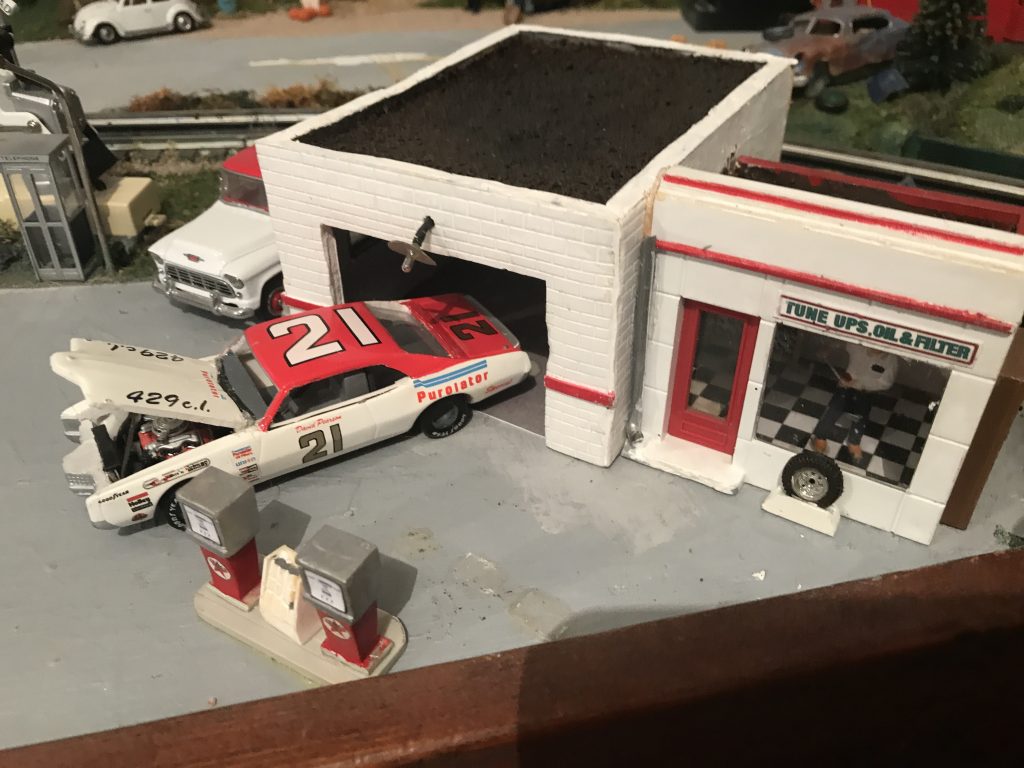
The Bachmann Brothers plastic company began producing the O-scale Plasticville small gas station in 1950. Its initial production spanned the years 1950-1954 and it was reissued again in 1967. The assembled structure measured 8 ¼” long x 2X ½” deep and 2 ¾” high. That’s a scale depth of 10 feet. A typical American automobile is 14 ½ feet long and the average single car garage is 12′ x 22′, so you can see that the small Plasticville gas station is severely under-sized. In fact, a scale car or truck is about 4 ¾ inches long; 2 ¼ inches longer than the bay. Additionally, the station’s bay doors are too narrow and the roof to low to look real. This article tells how I remedied those problems.
Time and Difficulty
The goal of this modification is to make the garage bay large enough to accommodate a 1:43 – 1:48 scale car or truck and give the station a more realistic appearance overall. This project will take moderate model building skills and a day or more to complete.
What You’ll Need
A Plasticville small Gas Station
a hobby or razor saw
a ruler
a jeweler’s file
1/8″ thick foam-core poster board (10″ x 10″min)
razor or hobby knife
white or Carpenter’s glue
Tacky Glue (see recommendation)
hot glue gun and glue sticks
Styrene sheet with concrete block texture (see sources)
Clear Plastic sheet (can be cut from discarded blister packs)
Grandt Line 18-pane Factory window (optional)
strip styrene, 4″ scale width
clean fine sand
aluminum foil, cut to 2 x 3 inches
18 volt GE-1813 incandescent bulb and socket or L.E.D.
18 volt grain-of-wheat bulb and shade
printed graphics (see link at the end of this post)
resin-cast detail items
white chalk paint
glossy enamel paint in your station’s color
light grey or tan flat acrylic paint
Building Modification
Begin by cutting the front wall of the gas station apart between the entrance door and the first bay door. Be sure to cut all the way through the wall as vintage Plasticville material is usually quite brittle and does not snap cleanly like modern styrene.
Measure from the outside wall to your cut. Carefully transfer the measurement to the roof and rear wall sections and cut them as well. Set aside the office walls and the short section of roof to reassemble the office. You could potentially use the front and rear walls of the garage section and just cut new side walls and roof, but I decided to cut an entirely new garage bay from foam core board.
After cutting the front wall, you will find the name “Plasticville” is split between the two sections. Take a jeweler’s file and remove the raised letters “Plasticville” from above the door on the front wall.
Build A New Bay from Foam Core
To construct a new scale 17′ x 22′ scale bay for the station, cut the following pieces from a sheet of 1/8″ foam-core posterbord:
Two 4 ½” x 2 ½” panels for the front and rear wall
Two 5 ½” x 2 ½” panels for the side walls
One 4 ½” x 5 ½” roof panel
Use Tacky glue to attach sheets of textured Evergreen Styrene to the wall panels. Trim to fit. Use Tacky glue or hot glue to assemble the four wall panels together to make a box 4 ½” x 5 ½” box 2 ½” high. I painted the block walls a chalky white. Cut an opening for a Grandt Line Factory Window in the side wall of the garage. If you do not have a Grandt Line window, you can cut a donor window from a Plasticville airport hangar or a Plasticville Bank. Again, be sure to cut all the way through as Plasticville material is brittle and will not snap cleanly like modern styrene.
Glue a scale 4″ band of strip styrene horizontally about one-third the way up the wall as a construction detail. Paint it with a glossy paint. I painted it a contrasting glossy red. Recess the roof section about 1/8″ from the top of the box, and glue it into place. Cover the roof top with white glue and sift on a layer of fine sand to resemble roofing gravel. When it dries, paint it with light grey or tan acrylic paint to both color it and seal it down. Hint: do not use black or dark grey for the roof; it should appear sun-faded.
Modify the Bay Doors
The stock red Plasticville garage doors are too narrow for O scale, so use a razor saw to trim the edges and join the two garage doors into a single, wider door. Glue a strip of styrene across the back side of the joint to reinforce the junction and keep it straight.
Reconstruct the Office
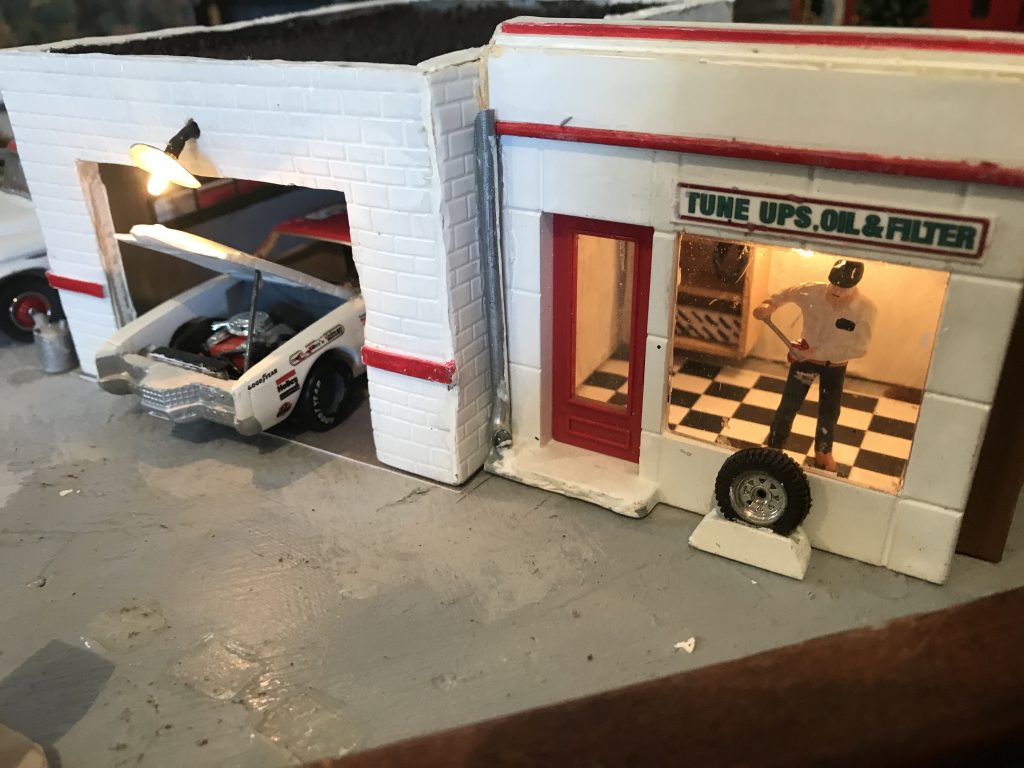
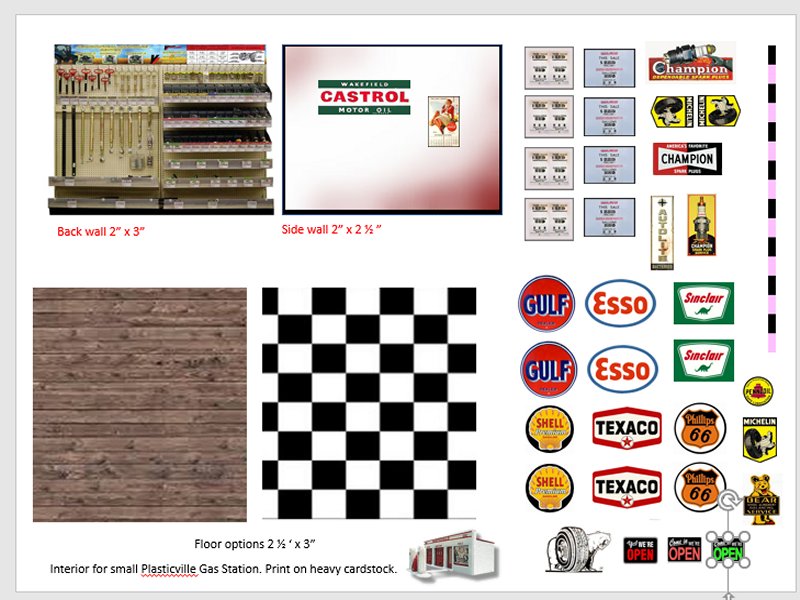
Turning your attention back to the office, file off the window tabs that hold the cardboard window insert. Use Tacky glue to glue together a frame of 4″ scale strip styrene and glue a piece of clear plastic to the inside of the opening. Glue another piece of clear plastic to the inside of the door opening. Use Tacky glue to cover the inside roof portion with the aluminum foil. This will help distribute the interior lighting later. Print the graphics sheet (see the link at the end of this post).
Cut out the interior wall graphics and glue to the side and rear walls. The sheet includes wall calendars, signage, and both a wooden floor and a tile floor graphic for you to choose from. When everything is dry, glue the office together with hot glue.Paint the office with chalky white and a gloss color to match the bay.
Cut a large hole in the side wall of the foam core garage bay where the office will attach. This is to let light into the bay. Attach the office to the garage bay section with hot glue.
Lighting
Here you have a choice of lighting. I used a single GE-1813 type, 18 volt incandescent bulb in a bayonet base to light the interior. I hot-glued the bulb base on the ceiling between the office and the bay so the lamp would light both interiors. Alternatively, you could use two white LEDs with a current limiting resistor (see my article on lighting with LEDs).
Drill a small hole in the front bay wall directly over the center of the door opening and fish the wires of a grain-of-wheat bulb with shade through to the inside. Again, you could use a super-white LED for this. (A super-white will throw a spot of light on the ground in front of the station). Solder or tape the leads to the wires that connect in parallel to the GE-1813 bulb, or other LEDs, and run the wires for both lamps down the inside corner of the back wall. Secure with hot glue. You can leave the wires bare for the connection, but I recommend you build an electrical junction instead.
Add Finishing Touches
I painted the layout base where the garage bay would sit a concrete grey and dripped some blackish-brown wash on for oil stains. I glued the checkerboard graphic to the base where the office would sit. In front, I placed a surplus tire from a model kit mounted in a frame built using scraps of styrene. I glued a resin-cast tool cabinet (of unknown manufacture) to the side of the office. I reused the Plasticville oil cans, but scratch-built modern fuel pumps. I glued pump graphics to the face of the pumps. I added resin castings of oil drums, boxes and tires to the back, and added foliage and weeds to complete the station transformation.
The Graphics for this Project
This PDF File includes all the graphics used in this project.
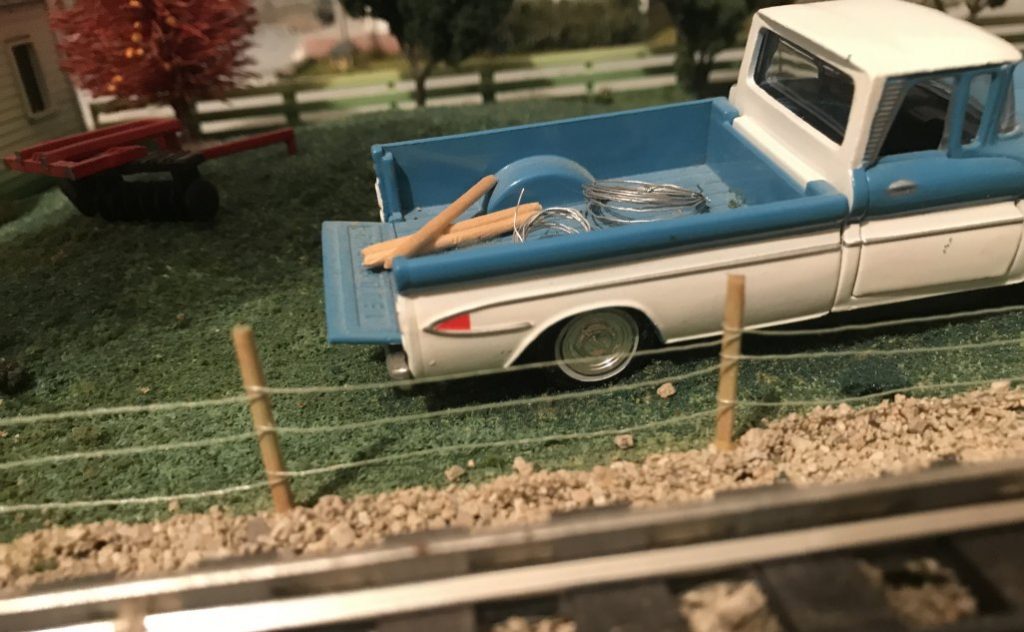
A farm truck holds the supplies to repair a barbed wire fence
Barbed wire fences are typically used on farms and ranches to contain large animals on the property. Barbed wire fences typically have three or four runs of twisted metal wires with sharp barbs evenly spaced along the length of the wire. Steel fence posts are driven into the ground, and the barbed wire is stretched tightly between the posts, evenly spaced from top to bottom. Barbed wire fences are a little more difficult to model than chain link fence, and they take a little more work.
Time and Difficulty
The Goal is to provide an easy way make a reasonable representation of a three- or four-strand barbed wire fence in that can be accomplished in less than a day.
What You’ll Need
Square toothpicks
Red or green and white paint
Wire screen mesh materials
Tacky glue
grass-colored finely ground foam
Small drill bits (the same diameter as your toothpicks)
Diagonal cutters, a sharp knife, or a hobby saw
Measurement and Post Installation
The installation procedure follows real-world fence construction. First, you need to determine the number of p The installation procedure follows real-world fence construction. First, you need to determine the number of posts you will use. Measure the total distance you need your fence to cover. Measure each section of straight run from corner post to corner post separately. Divide the total distance by your intended separation of you fence posts (I recommend 2, 2.5 or 3 inches). Round up to the next whole number. For example: You want to build a fence run of fourteen inches with a post spacing of approximately three inches apart. To determine he number of posts, divide the 14” run by the 3” spacing to get 4.666. Round up to 5 posts. If you decide to space the posts closer to two inches apart, you will need a total of eight posts (14” divided by 2” equals 7, rounded up to 8). Equally space the posts by dividing the run distance by the number of posts, (for this example, 14″ divided by 5 posts equals 2.8″ or approximately 2 3/4″ spacing) Mark the corners and place a mark every 2 3/4″ to show where each post will go. Adjust if necessary to make each section the same length.
For barbed wire fence posts, you will need square toothpicks instead of round. Paint them either glossy green or red. The top 1/8″ of each fence post is painted white if you want to simulate the reflective coating on the top of some manufactured posts. Drill holes and set the toothpicks with a drop of Tacky Glue. Doo not wipe away any excess glue, but embed a bit of grass-colored finely ground foam in the glue for a more natural look.
Stretch the Fence
You can use either single strands of wires unraveled from screen mesh material, or a small-gauge non-insulated wire. I like to use wire pulled from screen mesh instead of regular straight wire because it has a kinkiness that simulates the stranding of real barbed wire. If you use the wire mesh, unravel an edge of the screen producing three or four long strands of wire.
Put a drop of tacky glue near the bottom of the end post, and wrap the wire around twice, twisting the loose end around itself to secure it. Then run the wire from post to post giving each post a double wrap of wire and a dot of glue. Secure the wire to the final post just like the first post. Repeat each run a little higher on the post for three- or four-line fencing.
Variations:
Instead of steel, use wood posts. Before steel posts, farmers used hardwoods like locust or oak to build line fences. You can build your fence with wooden posts. The tree posts were typically 6″ to 8″ in diameter. You can also use trees in your line fence. It was not uncommon for fences to be strung from tree to tree since old property lines were described as “from this tree to that tree,” and especially for a tree to be used as a corner since it would hold up better than a post. Sometimes a metal post will be used to replace a broken or rotted wooden post in a line fence, so you can mix woods and steel posts randomly in a fence line. Finally, it is really hard to keep a fence line clean. Glue plenty of weeds along the bottom of the fence and fence posts.
The split rail is one of the oldest and simplest of fences
Split-rail fencing is one of the oldest and simplest fences to build. It was very prevalent in the 1800’s along farmlands to keep animals contained. Years later, the rustic beauty was used for home landscaping. Today, you kind find split-rail fencing in parks, campgrounds and historic sites.
The rails of the fence were split from the trunk of a tree and cut to length, usually 8 feet. The split rails were laid on top of each other at a little more than a 90 degree angle. The rails alternated back and forth for stability and no posts were required. Because the bottom rails lay directly on the ground, no holes had to be dug, The fence was quick to put up, especially in rocky terrain where digging post holes was out of the question. however this also meant the fences did not usually last long.
Time and Difficulty
The goal of this project is to build a simple historic and decorative fence. The project is super easy and takes less than a day.
What You’ll Need
long fireplace matches or similar sized wood
hobby saw or knife
aging wash (see instructions)
tacky glue
Building the Fence
To build split rail fences in O scale, long fireplace matches are the way to go. Simply cut the heads off and cut them into scale six-foot or eight-foot pieces. The more imperfections the matchsticks have, the better the final product will look. You can leave them natural color for new fences. For older fences, scrape a serrated hobby saw along the face of the stick to texture the surface, then paint with a traditional grey ink wash, or with a weathering product I recommend: Age-It Easy liquid wash.
Grey Ink Wash
Make a grey ink wash by diluting india ink or black acrylic paint with water and a drop of dish washing detergent or isopropyl alcohol. Stain each stick individually before stacking and gluing. The weathering wash will not penetrate most glues.
Here is a good article by Harold Minkwitz on weathering wood on the Pacific Coast Air Line Model Railway.
Build It
Stack the sticks with between a forty-five and a ninety degree angle between rails, using a drop of tacky glue to secure them. For older fences, you may break a rail or two, have some rails fallen over, or even glue foliage climbing over the neglected rails.
So there you go, good friend. A super simple method for building historic fences on your layout.
Chain link fencing protects people, animals, and property
The chain link fence is one of the most common types of fence. It is used around commercial businesses as a barrier to protect property from vandalism and inventory from theft. It is used around schools and public buildings to limit people’s access and to keep children safely away from traffic, water, or electrical dangers. It is used around homes to keep pets from running away or biting the neighbors. I’m sure there is some place on your layout that could use some chain link fence.
Time and Difficulty
Chain link fences are made by stretching a woven wire material between aluminum posts. We will duplicate that in O-scale using screen wire mesh. This project is very simple, but may take a few days depending on how much fencing you want to install.
What You’ll Need
Round toothpicks
Silver paint
Wire screen mesh material
Tacky glue
grass-colored finely ground foam
Small drill bits (the same diameter as your toothpicks)
Diagonal cutters, a sharp knife, or a hobby saw
Chain link fencing is easy to make with screen wire and toothpicks. You’ll need round toothpicks to be the posts. Be sure to use wire screen mesh and not the fiberglass mesh; the fiberglass is flat, not woven, and it doesn’t give the right “look.” When I built the chain link fence in the picture above, I simply cut a long strip of mesh along the edge of the material. Perfectionists and those who model high rail will realize that the mesh pattern is off by 45 degrees. That’s okay for me. Admittedly, the mesh material looks more realistic if you cut it on the diagonal verses parallel with the pattern. There will be a lot of wasted material cutting on the diagonal, but if you want the appearance to be the most realistic, you should cut your screen material on the diagonal.
comparison of cutting the wire mesh parallel to the edge versus cutting it on the diagonal
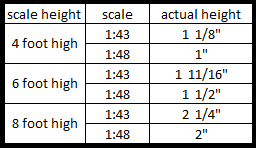
Residential chain link mesh is four feet high. Commercial applications can be six foot or higher. For a standard four-foot high fence, cut a strip of screen material from 1″ inch to 1 1/8″ inch wide. (The reason for the range of values is to account for variations of what “O scale” is). The ranges I give allows for a variation in the scale between 1:43 and 1:48 ratios. For a six foot high fence, cut a strip of screen wire 1 ½ to 1 9/16 inches wide. For an eight foot high fence, cut a strip between 2 inches and 2 ¼ inch wide.
Cut your screen mesh material to the actual height.
Measurement and Installation
The installation procedure follows real-world fence construction. First, you need to determine the number of posts you will use. Measure the total distance you need your fence to cover. Measure each section of straight run from corner post to corner post separately. Divide the total distance by your intended separation of your fence posts (I recommend 2, 2.5 or 3 inches). Round up to the next whole number. For example: You want to build a fence that runs fourteen inches with a post spacing of approximately three inches apart. To determine he number of posts, divide the 14” run by the 3” spacing to get 4.666, then round up to 5 posts. If you decide to space the posts closer to two inches apart, you will need a total of eight posts (14” divided by 2” equals 7, rounded up to 8). Equally space the posts by dividing the run distance by the number of posts, (for this example, 14″ divided by 5 posts equals 2.8″ or approximately 2- 3/4″ spacing) Mark the corners and place a mark every 2-3/4″ to show where each post will go. Adjust if necessary to make each section the same length.
Select toothpicks that are round, not square. Do not cut them yet. Paint them silver. Using a drill bit slightly smaller than the diameter of the toothpick, drill holes where you marked for the posts. Glue the toothpicks in the holes with tacky glue. Instead of wiping away any excess glue around the base, embed a little grass-colored ground foam in the glue for a more natural look of weeds or grass growing up against the post.
When the glue has dried, stretch the screen material out and tie it to the top of each post by threading a short piece of wire through the material and twisting it around the toothpick like a bread-tie. Once tied to the post, put a drop of tacky glue to secure it. You may prefer to run a bead of tacky glue down the length of each post to secure the mesh to. Wire tie and glue the mesh at the bottom also. Proceed to tie the material to the top and bottom of each fence post using a dot of tacky glue to hold it securely. Cut off the excess post above the fence material with diagonal cutters, a sharp knife, or a hobby saw. Touch up the top of the posts with paint if needed.
There you have it. A quick way to make chain link fence for your model railroad.